Resin art has a rich and deep significance. After all, it comes in a variety of shapes and sizes, each requiring a particular sort of resin. As a result, before you can answer the question “What is resin art?” you must first comprehend what resin is. We’ll show you how to produce resin art and explain what resin is.
What Is Resin and How Does It Work?
Resin is a high-gloss, high-viscosity material that can be found in both organic and synthetic forms. Because it has certain characteristics with plastic, there are many differing viewpoints on the two materials
Most people regard it to be a form of plastic, whereas others believe that plastic is merely the outcome of processed resin. On the other hand, some people mistakenly assume that plastic and resin are the same thing. However, the substance we’ll be talking about isn’t the same as the plastic used in plastic bags.
Resin Types Used in Art
There are many different types of resins and polymers, but only three are typically used in art:
- Acrylic
This resin, as its name suggests, is used to make clear acrylic items such as lenses, screens, and containers. It’s manufactured by combining a powder, acrylic polymer, and methyl methacrylate monomer, which acts as a hardener. As a consequence, you’ll have a thermoplastic product that can be reheated and manipulated even after it’s set.
- Polymer
Thermosetting plastics, such as polymer and epoxy resins, do not melt like thermoplastics do when exposed to heat. Heat, or another form of catalyst, on the other hand, can solidify them, leaving a solid end product that cannot be remelted.
Polymer can be thought of as a low-cost alternative to epoxy resin, but with a lower quality. As a result, we only use it for mould casting and not for applications that require a more delicate appearance. But feel free to play around with it, especially since it’s less expensive than epoxy. Polymer resin, on the other hand, contains potentially hazardous components. In particular, it should not be used in a restricted space.
- Epoxy
Epoxy resin is our favourite go-to material for creating art since it can be used to create a variety of resin art. Plus, epoxy is the safest of the three resins to deal with, as indicated by the lack of a bad odour and several health warning warnings.
However, you should exercise caution when using it because it has the potential to induce a severe allergic response to the skin.
How can you make resin art easily?
Simply described, it’s a work of art made from resin materials, especially polymer or epoxy resin.
In order to make polymer or epoxy resin, you must combine two ingredients: the primary resin ingredient and the liquid catalyst or hardener.
- Casting
Casting is the method of pouring the resin mixture into a mould. For resin casting, you may utilise a variety of items and moulds. Even better, you can make your own. Simply avoid using tiny plastic ones, such as those used to create candy, since the resin will cling to them.
Silicone baking moulds are a good option because they’re inexpensive and come in a variety of patterns. Examine the inside finish of the mould you’ve chosen as well. It can be either glossy or frosty, which will determine the completed piece’s outer texture.
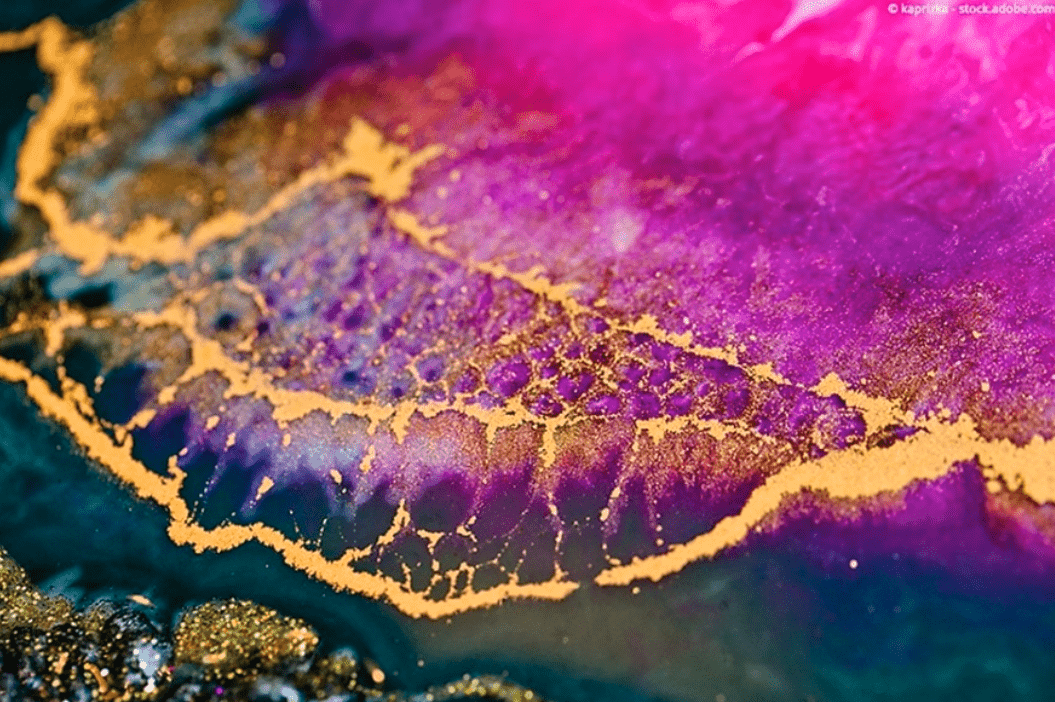
- Pouring
Pouring, like the one we’re devoted to, is another popular way for creating resin art. It’s a technique in which resin is poured over a surface to create a marbled 2D sculpture, rather of casting, which generates 3D ones. The transparent and ethereal layering of hues that pouring creates is difficult to replicate with other materials.
- Coating
Coating is a process that combines casting and pouring techniques to cover an item with resin for sealing or aesthetic reasons.
You’ll find that resin may be used to coat a variety of materials, both biological and artificial, such as flowers and wood, as well as toys and souvenirs.
Resin Art: A Step-by-Step Guide
Resin art is a lot of fun, therefore we encourage trying each approach (or a mix of them) to discover your “inner resin art voice.”
- The First Steps to Take
Making resin art, however, begins with a number of essential procedures, regardless of how much you can explore and experiment with it.
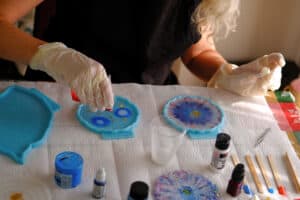
- Put on safety equipment.
Always put on gloves before handling any resin product. When dealing with polymer, a face mask is also advised.
- Get your Resin Mixture Ready
Using two separate measuring cups and a wooden popsicle stick to stir, combine your resin and hardener according to the ratio specified on the container.
Use polypropylene measuring cups wherever possible. There are several companies that produce disposable measuring cups designed exclusively for resin painting.
Conclusion
However, due to their reusability, we favour polypropylene ones, including throwaway versions. Simply roll the cup in your palm to remove set or hardened resin. The sound of the resin breaking from the cup will give you a pleasant crunch.
It may be easily peeled out with your fingertips. It’s simpler if you keep the wooden stirrer in since you can drag the resin out with it. Clear tape can be used to remove tiny fragments. Polypropylene and resin do not mix, making the separation of the two quite simple, even with minimal effort. Want to learn resin art then login today and enjoy this Resin Art Guide from acrylgiessen.com